
In this menu you will find mostly standard commands like open, save, print and exit. There are also some special commands that are unique to PHOTOGENETICS.
Open...
Load an image into PHOTOGENETICS using the standard Windows file selector. You may choose between the different file types supported by PHOTOGENETICS.
The command may be executed from the keyboard using CONTROL+O.
Open Special...
This command opens the Image Browser Window. In the browser window you may select one or more images from the displayed previews to be loaded into PHOTOGENETICS. Additionally you may assign genotypes and image orientation to image files individually that are executed immediately after loading into PHOTOGENETICS or you may use the comfortable batch facilities to optimize images automatically. The Image Browser may also be called from the toolbar.
See also: Using the image browser
Close
Use this command to close the active image shown in front. If the image has been modified you will be asked if you want to save the modified image or discard any changes. The same function may be called by double clicking the document icon in upper left corner of the image window.
Save
Use this command to save the modified image and overwrite the original image file. If you want to keep your original file you should use the Save as command instead to save your image into a new file. Depending on the file type being used you may be asked to set up further options as the compression quality.
The command may be executed from the keyboard using CONTROL+S or called from the toolbar.
Save As...
Use this menu command to save the modified image into a new file using the standard Windows file selector. You may also choose a different file format. Depending on the file type being used you may be asked to set up further options as the compression quality.
After your image has been saved the panel "New Genotype" will appear and give you the opportunity to save the genotype (= image optimization method) you produced while optimizing your image. If you want to do so enter a filename and a description for the genotype and click on the "Save" button. From now on the new genotype will be available from the Genotypes List in the main window.

See also: Working with genotypes, Genotypes List
Save Genotype As...
Every image evolution produces a new genotype (= image optimization method) that may be saved for use with other images. When you execute this command the panel "New Genotype" will appear on the screen. Enter a filename and a description for the genotype and click on the "Save" button. From now on the new genotype will be available from the Genotypes List in the main window.
See also: Working with genotypes, Genotypes List, Save as...
Acquire...
Use this command to access your digital camera or any other image source directly provided a TWAIN driver for that image source has been installed. If you have connected more than one imaging device to your computer you have to select the image source first using the "Select source..." command.
What you may do with this command depends completely on the installed TWAIN driver. Look up the documentation provided with your camera's software for more details.
See also: Acquiring Images from your Camera
Select Source...
Use this command to open the "Select source" panel where you may choose between different image sources for the "Acquire..." command. The "Sources" list will contain an entry for every installed TWAIN driver. Select your hardware device from the list and click on the "Choose" button or double click the entry you want to select. If the list is empty, no TWAIN driver has been installed.
See also: Acquiring Images from your Camera
Print...
Use this command to print the active (frontmost) image. The standard Windows printer dialog will appear as in any other software. The available options depend on the printer you are using.
Printing images from PHOTOGENETICS is different in one respect from any other software: By the use of so called "Printer Genotypes" you will achieve higher quality or adapt the printout to your personal taste. Printer genotypes have to be developed using the the "Printer Calibration..." and may be chosen in the Preferences... panel.
See also: Calibrating your printer, Printing images
Print Preview
This command calls the standard Windows print preview window and shows the active image placed on a sheet of paper (depending on "Printer Setup..."). You may zoom into the image by clicking on the image with the mouse or by using the "Zoom in" button. To zoom out again you have to use the appropriate button. You may start the printout using the "Print" button or just close the window again.
See also: Calibrating your printer, Printing images, Preferences...
Printer Setup...
This command calls the standard Windows printer setup dialog, where you may choose and set up your printer and select paper size and orientation. The details depend on the printer you are using.
See also: Calibrating your printer, Printing images, Preferences...
Printer Calibration...
With this command you start the printer calibration process and thus produce a new printer genotype. You have to select a printer first using the "Printer Setup..." command. During the calibration process four series of images (grey. red, green, blue) are printed and you have to choose the best one of each series. At the end of the calibration process you have to give a name to the new printer genotype. From now on it may be chosen in the "Preferences..." panel and will be used with the "Print..." command. You may execute this command more than once to provide different genotypes for different printers and different kinds of paper or ink. A more detailed description of the calibration process is given in the chapter "Calibrating your printer" of the tutorial.


See also: Calibrating your printer, Printing images, Printer Setup..., Preferences...
Preferences...
This command opens the "Preferences" panel where you may set up basic system default values. The panel contains three popup menus, two directory paths and one option toggle.

With the "Dewarp Genotype" popup menu you may choose a special genotype for your digital camera (or lens) that provides information for the "Dewarp" function. These genotypes have to be provided by Q-Research. If your camera type is missing in the popup menu you should contact the support of Q-Research (support@q-res.com) or test which of the dewarp genotypes delivered with the program produces the best results with your camera.
With the "Printer Genotype" popup menu you may choose between different printer genotypes that you have produced yourself using the "Printer Calibration..." function. The selected genotype will be used when printing an image.
With the "Language" popup menu you may choose between different language versions of the software. You have to restart the program before the new language can be used. Which languages are available depends on the language modules (of type DLL) that are present in the PHOTOGENETICS program folder.
PHOTOGENETICS stores temporary data on disk while you work with the program. You may choose the harddisk and directory for temporary storage using the "Browse..." button.
The "Image Browser" of PHOTOGENETICS stores image previews and the assignment of genotypes and image orientation in so called cache files for faster display. You may choose the harddisk and directory for these cache files using the "Browse..." button. We recommend to leave this setting as it is as long as you don't have any problems with hard disk space on the drive that you use for PHOTOGENETICS.
The "Color Bar" is displayed in the main window when this option is checked (by default it is disabled).
See also: Calibrating your printer, Printing images, Printer Setup..., Printer Calibration...
Recent Images
The last four images you have loaded are listed here and can be loaded again by a single click.
Exit
You may quit the program with this command or by double clicking on the PHOTOGENETICS icon in the upper left corner of the main window. If you have loaded and modified images without saving them you will be asked if you want to save it for every image.
Besides the standard "Undo" command this menu contains all basic image editing functions of PHOTOGENETICS.
Undo
This command has a different meaning depending on the context. The following image editing functions may be "undone" with this command: "Dewarp", "Resize Image" and ""Crop Image". Only the last of these image operations may be reverted by the use of the "Undo" command. During the course of an image evolution the "Undo" command may be used as a step back function allowing to go back step by step through the whole evolution. So it is possible to start again at any deliberate point of the evolution process and go on in a different way from there. After an evolution has been stopped (finished) it is not possible to revert to the previous image version using the "Undo" command, but the original image may be restored at any time by applying the "NEUTRAL" genotype from the Genotypes List.
The command may be executed from the keyboard using CONTROL+Z.
See also: Evolving an Image, Dewarp, Resize Image..., Crop Image
Dewarp
In the context of PHOTOGENETICS "Dewarping" means correcting the geometric distortions that always appear in images the are shot with digital cameras using wide angle lenses. Before you can use this function you have to choose a dewarping genotype for your camera or lens in the Preferences... panel. After calling the "Dewarp" function you have to wait for a short time while the image is recalculated. A progress bar at the bottom of the main window is displayed during the calculation. You may revert to the previous image version by using the "Undo" command.
See also: Dewarping, Cropping and Resizing an Image,
Start Evolution
The image evolution is the basic and most innovative editing function of PHOTOGENETICS and my be started with this menu command or with the "Start Evolution" button below the image area. The image evolution is described in detail in chapter 1 of the tutorial, Evolving an Image, and we strongly recommend reading this chapter carefully even if you don't read anything else of the manual, as this function doesn't resemble anything you have seen before. During the course of the image evolution this menu entry will read "Stop Evolution" and may be used to stop the evolution process. The same can be done by clicking on the "Stop Evolution" button below the image area.
The evolution cannot be reverted by use of the "Undo" command, but you may apply the "NEUTRAL" genotype from the "Genotypes List" to return to the original image version.
The command may be executed from the keyboard using CONTROL+R.
See also: Evolving an Image, Working with genotypes, Genotypes List
Rotate Left
Use this command to rotate the image by 90 degrees to the left thus changing the format from portrait to landscape or vice versa. This function may be reverted by using the "Rotate Right" command (not by "Undo"). It may also be called from the toolbar and during image evolution.
Rotate Right
Use this command to rotate the image by 90 degrees to the right thus changing the format from portrait to landscape or vice versa. This function may be reverted by using the "Rotate Left" command (not by "Undo"). It may also be called from the toolbar and during image evolution.
Resize Image...
Use this command to diminish or enlarge the physical size of an image. When you execute this command the "Resize Image" dialog will appear on the screen.

The current size (in pixel) is displayed and you may enter the new size by setting either the new width or new height. The other value will adapt to your changes automatically as PHOTOGENETICS will always resize an image proportionally. We strongly recommend to use the "High Quality" option, especially when enlarging the image size. The calculation may take a bit longer but the result will definitely look better. Click on the "OK" button to start the resize calculation or on the "Cancel" button if you want to leave the image unchanged. The progress of the calculation will be shown in the status bar. You may revert to the previous image version by using the "Undo" command. You will find more information about resizing images in the Tutorial and in the Quick Tour.
See also: Dewarping, Cropping and Resizing an Image
Crop Image
Use this command if you want to keep only a detail or part of the whole image. It may be also called from the toolbar. If you execute this command the mouse cursor will change to the cropping tool. Draw a frame around the area you want to keep. If you now move the mouse cursor into the framed area it will change to the moving tool and you may move the whole frame by dragging it with the left mouse button pressed. If you move the mouse over one of the corner points of the frame it will change to a diagonal double arrow; you may now resize the frame by pressing the left mouse button and dragging it to a new location. You may resize its width or height also by moving the cursor to the middle of one of the sides or to the middle of the upper or lower border line; the cursor will change to a double arrow with horizontal or vertical orientation and you may now resize the width or height by dragging the borderline with the mouse.

In the image overview of the Navigator only the framed part of the image will be displayed in the normal way; the rest of the image is faded. Click on the "Crop Image" button below the image area to finish the cropping or on the "Cancel" button to return to the previous version of the image. While the image is recalculated the progress is shown in the status bar.
Even after cropping the image you may revert to the previous image version using the "Undo" command.
See also: Dewarping, Cropping and Resizing an Image,
Remove Red Eyes
This is a very special function that you will only need if you took a flash shot portrait of a person from the front and got the well known "Red Eyes Effect". If you call this function from the menu or the toolbar the mouse cursor will change to a pen and you may take the wrong red color out of the eyes by drawing upon the critical areas. If you are finished click on the "Accept" button below the image area or on the "Undo" button to return to the previous version of the image. If you have "accepted" a later "Undo" is not possible!
See also: Removing Red Eyes
In this menu you will find two groups of command that influence either the main window or the image display.
Toolbar
This is a toggle command. By calling it the menu entry will change from checked to unchecked or vice versa. If the menu entry is checked, the toolbar is displayed in the main window; otherwise it will be hidden. Together with the toolbar the color bar will be shown or hidden, if it is enabled in the "Preferences" panel.
If your screen resolution is only 640 by 480 pixel we recommend to switch off the display of the toolbar. Otherwise the main window will be to big for your screen and you won't be able to use all interface elements. All toolbar functions are accessible from the menu also - they are just shortcuts. You should also set the task bar of Windows 95/98 to "auto hide" mode to get a bigger screen area.
See also: Toolbar, Color Bar, Status Bar
Status Bar
This is a toggle command. By calling it the menu entry will change from checked to unchecked or vice versa. If the menu entry is checked, the Status Bar is displayed in the main window; otherwise it will be hidden.
See also: Toolbar, Color Bar, Status Bar
Navigator
This is a toggle command. By calling it the menu entry will change from checked to unchecked or vice versa. If the menu entry is checked, the Navigator is displayed in the main window; otherwise it will be hidden.
See also: Navigator
Genotypes
This is a toggle command. By calling it the menu entry will change from checked to unchecked or vice versa. If the menu entry is checked, the Genotypes List is displayed in the main window; otherwise it will be hidden.
See also: Genotypes List
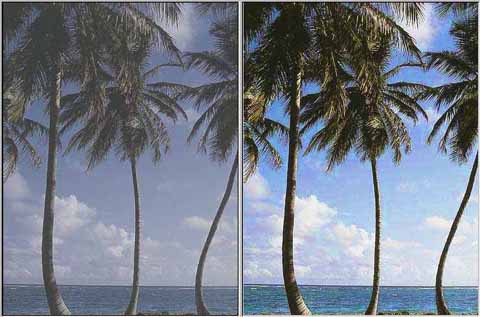
Compare to Original
This command only makes sense if you modified the image by an image evolution or by applying a previously defined genotype from the Genotypes List to an image. When you call this command from the menu or from the keyboard by pressing CONTROL+Y two versions of the image will be displayed in the image area for comparison: the original version on the left side and the modified version on the right side. This is very useful if you want to see how the image evolution or the application of a genotype have changed your image.
While you are in this display mode you may still change the display size and visible area of both image versions using the Navigator and the scroll functions or the menu command "Optimal View". The display of both image versions is always synchronized; all changes of display size or image area (zooming and scrolling) take the same effect on both image versions so that you always compare the same part of both versions.
It is also possible to apply genotypes from the genotypes list to the left image and see the result on the right side while you are in this display mode. So this is a very convenient way to check the influence of some previously defined genotypes on any image.
While you are in this display mode the menu entry changes to "Show optimized only". You may return to the normal display mode by calling this menu command or by pressing CONTROL+Y on the keyboard or by clicking on the "Back" button below the image area.
See also: Evolving an image, Working with genotypes, Scrolling and Zooming in the Image Window, Image Area, Navigator, Genotypes List, Optimal View
Optimal View
Use this command from the menu or by pressing CONTROL+H on the keyboard to set the display size of the active image so that it fits exactly into the Image Area. This command will work during normal display mode, in "Compare to Original" mode and during an image evolution.
If you have loaded more than one image and are in "stacked" or "tiled" window mode the active image will come to the front and fill the whole image area by use of this command.
See also: Scrolling and Zooming in the Image Window,
All commands of the "Window" menu only make sense if you have loaded more than image into PHOTOGENETICS. You may then use these commands to access any single image or to arrange all image subwindows inside the image area. This menu will change dynamically as a new menu entry will be created for every new image that you load into PHOTOGENETICS.
Cascade
Use this command to make all images visible and accessible as stacked subwindows. By clicking on the title bar of any subwindow you may bring it to front and make it the active window. By clicking on the "Maximize" icon in the title bar of any window you may bring it to front so that it fills the whole image area. You may also call the menu command "Optimal View" in the "View" menu; it will change the display size of the currently active window so that it fits exactly into the image area and therefore hides all other subwindows.
See also: Image Area, Optimal View
Tile
Use this command to make all images visible and accessible as subwindows beside and above each other in a tiled mode. By clicking on the title bar of any subwindow you may bring it to front and make it the active window. By clicking on the "Maximize" icon in the title bar of any window you may bring it to front so that it fills the whole image area. You may also call the menu command "Optimal View" in the "View" menu; it will change the display size of the currently active window so that it fits exactly into the image area and therefore hides all other subwindows.
See also: Image Area, Optimal View
Arrange Icons
You may minimize some of the image subwindows using the minimizing icon in the title bar of the windows and move them to any place within the image area of the main window. Use this command to arrange all iconized windows neatly at the bottom of the image area.
See also: Image Area
Image Names
For every image loaded into PHOTOGENETICS a menu entry will be added to the "Windows" menu with the name of the image. You may bring any image to the front and make it the active image filling the whole image area by selecting its menu entry.
This menu contains two entries for special advanced editing functions.
Color Temperature...
If you execute this command the "Color Temperature" dialog will appear on the screen and you may change the color temperature with the slider. Moving it to the left (negative values) will simulate a warmer, more redish light source. Moving it to the right will simulate a colder, more blueish light source. The result is immediately shown in the image. Click the "OK" button to make the change permanent or the "Cancel" button to leave the image unchanged. There is no "Undo" for the change of color temperature, but it may be changed again at any time.
The setting of the color temperature is also part of an image evolution. If you want to set it manually you should do so before evolving an image, but of course it is also possible to change it afterwards. In any way the change of color temperature becomes part of the actual genotype and is kept as part of the method if you save the genotype for further usage. This command may also be called from the toolbar.
See also: Setting the Color Temperature, Evolving an Image, Working with genotypes, Save Genotype as...
Genotype Intensity...
Use this command to reduce the intensity or strength of a genotype you produced by the image evolution or applied to an image from the Genotypes List. If you execute this command the panel "Genotype Intensity" will appear on the screen. The slider will always be set to 100% (rightmost position). You may reduce the genotype's intensity by moving the slider to the left until you have reached the desired effect. The result of the intensity reduction will be immediately shown in the image. Click the "OK" button to make the change permanent or the "Cancel" button to leave the image unchanged. There is no "Undo" for the change of a genotype's intensity.

The change of a genotype's intensity changes a genotype permanently. If you save this genotype you save the reduced version.
See also: Changing Genotype Intensity, Evolving an Image, Working with genotypes, Save Genotype as...
There is only one entry in this menu that brings the "About PHOTOGENETICS" panel to the screen.
About PHOTOGENETICS
This command brings the panel "About PHOTOGENETICS" to the screen. It contains a link to the homepage of Q-Research which you may use to call your internet browser and connect directly with Q-Research looking for more information, updates or support. This command may also be called from the toolbar.
©1999 Q-RESEARCH Inc. All rights reserved.